This is a guest post from the "Whenever-I-Feel-Like-It Baker", the sister of the Monday Morning Baker. (You won't find me waking up at 4 am on a Monday morning, that's for sure.) I also am a little less interested in bread and more interested in sweets and desserts like cakes, pies, and cookies. So while I was in town for Christmas, Dennis and I did a LOT of baking for our friends and family for the holiday. We also had a great time sharing recipes and trying out a few new tricks. Some of the highlights included: molasses spice cookies (a sweet and spicy chewy cookie), sugar cookies with royal icing, sea salt caramels, homemade marshmallows, homemade hot chocolate mix, and a pumpkin pie. Today I'm going to share the recipe for the homemade marshmallows because I had a lot of fun trying this out.
Homemade Marshmallows (adapted from smitten kitchen)
We halved the recipe from the website because we thought that 96 marshmallows was probably overkill.
1/2 cup powdered sugar
1 3/4 envelopes (1 Tbsp. + 1 1/4 tsp.) unflavored gelatin
1/2 cup cold water, divided
1 cup granulated sugar
1/4 cup light corn syrup
1/8 tsp. salt
1 large egg white
1/2 Tbsp. vanilla extract
Oil the bottom and sides of an 8 inch square baking pan and dust with powdered sugar, shaking the powdered sugar around the pan to coat evenly. We also lined the bottom of the pan with a square of parchment paper and proceeded to oil and dust that as well.

In the bowl of a standing mixer, sprinkle the gelatin over 1/4 cup cold water and let stand to soften while you boil the sugar syrup. We used the stand mixer for this, but the original recipe states you could also use a handheld mixer. (I haven't tested that, so if you try it, leave a comment to tell everyone how it worked!)
Boil the sugar syrup. In a large heavy sauce pan, cook the sugar, corn syrup, the remaining 1/4 cup of water, and salt over low heat, stirring with a wooden spoon until the sugar is dissolved. Increase the heat to medium or medium high and boil without stirring until the mixture reaches 240 degrees F on a candy thermometer, approximately 10-12 minutes.

Here I will digress slightly to discuss some principles of candy making. These days I know many of us are concerned about health and are generally averse to the dreaded HFCS (or high fructose corn syrup). It is called for in this recipe for a specific reason: Sugar dissolves into water to make the syrup for candy. As the mixture boils, the water evaporates as steam, allowing the temperature of the mixture to rise beyond the boiling point of water. As this process occurs, the sugar crystals also have a tendency to reform and precipitate out of the solution (think rock candy). The corn syrup helps prevent this from happening, as does boiling the mixture without stirring.
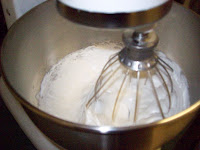
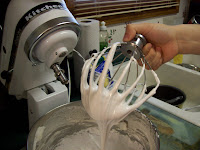
When the mixture has reached 240 degrees, remove the pan from the heat and CAREFULLY pour the sugar over the gelatin stirring to dissolve. I found that the mixture bubbled up as I poured it, so make sure you are very careful. The sugar is extremely hot and sticky (a bad combination). If you are making this with children, obviously don't let them anywhere near this step of the process. With the standing mixer, beat on high until white, thick, and almost tripled in volume, around 8 minutes.

In a separate bowl with clean beaters, whip the egg white to stiff peaks. Beat the egg white and vanilla into the sugar until combined. This step really seemed to change the texture of the mixture and make it somewhat less sticky. Pour the mixture into the prepared pan and sift 1/4 cup of powdered sugar over the top. Chill until firm, 3 hours to overnight.

Run a knife around the edge and invert the pan on a cutting board. Lifting up one corner, loosen the marshmallows and ease out onto the cutting board. Trim the edges and cut into 1 in. cubes. Roll in powdered sugar to prevent sticking. I was nervous that these would stick to the pan, but we really had no problem getting them out. We used a lightly oiled board scraper to cut them neatly into squares.
Variations: We made the recipe as stated above, but I've already come up with some great ideas for variations. These marshmallows have a fantastic, strong vanilla flavor. You could substitute peppermint extract for a peppermint marshmallows. A bit of food coloring added to the mixer could also make these colorful and cute. We used the marshmallows for snacking and in hot chocolate, but I'm already excited to make them next summer and use them around a campfire for some wicked s'mores! Finally, I'm pretty sure you could use the mixture without spreading it into the pan the same way you would use a jar of marshmallow fluff. (Homemade marshmallow rice krispie treats, anyone?? Or cream cheese marshmallow fluff fruit dip? The possibilities here are very exciting.) Of course, I haven't tested any of these ideas, so if you do, or if you come up with something else, leave a comment to let us know how it worked!
I really enjoyed writing this guest post and I hope you enjoy this recipe!
No comments:
Post a Comment